
In light of the current pressures on workforce and capacity at the moment, we will be pausing the Performance in Initiating and Delivering (PID) clinical research exercise until further notice.
Please don't hesitate to contact CTP@nihr.ac.uk if you have any questions or concerns.
For the financial year 2012-2013, NHS data for the Performance in Initiating and Delivering Clinical Research (PID) exercise was submitted using Excel spreadsheets uploaded to PID page of the NIHR Portal. A web-based submission system Clinical Trial Performance (CTP) Submission Platform has been developed for use from Quarter 1 2013-2014 onwards.
Quick tips
- The web-site for the CTP Submission Platform
- Please begin data entry and validation as soon as possible after each quarterly submission is opened. This will enable identification, reporting, and correction of any functional issues well in advance of the submission deadline.
- Spreadsheets are linked to specific providers and quarters. If you decide to work in the spreadsheet, be sure to download a new spreadsheet each quarter after deleting all old spreadsheets and never share spreadsheets between providers.
- Please add noreply@ccfctp.nihr.ac.uk to your safe sender email list in order to avoid communications from the platform being blocked by your local firewall.
- The login password you choose must be between 8 and 16 characters in length. This needs to contain at least one number, one upper case letter and one lower case letter, and one of the following symbols: ! @ # $ % ^ & * ( ) _ + } { : ; ’.
- The submission window is a rolling 12 month period from the last day of the quarter. The data cut off is the last day of the quarter, not the submission deadline. Dates of submission windows for specific quarters can be found in sections 27 and 28 of the PID Guidelines. Any changes affecting data that occur between the end of the quarter and the submission deadline should be included on the following quarter’s return.
- Clicking the ‘Lock Table Width’ button in the web table will freeze the first (Title) row and the ID column to make entering data easier. This function will only work in Internet Explorer (IE) 9.
- Press ‘Save’ to store your data on the system. Please save regularly to avoid the potential loss of data. The system is set to time-out after 30 minutes and will not give you a warning.
- If you are unsure of what a button does or what format needs to be used in a field, hover over the button or field and a message box will appear with further information.
- Spreadsheets should be opened and not saved when first downloading from the website but after macros are enabled, a local copy can be saved and shared internally if desired. Just be sure NOT to have the spreadsheet and the web form open at the same time. This could cause duplications and errors in your submission.
- The system will validate each record from left to right. On the Platform web table, any errors will be highlighted in red and a message box explaining the error will appear when the mouse is hovered over the field. On the spreadsheet, the errors will be explained in the ‘Errors’ or ‘Warnings’ column at the far right of the table. The system may flag up errors if you save or validate before the record is complete; once you have completed the record correctly, hit ‘Save’, log off the system for a few minutes and when you log back in again, the validation should be resolved.
- When you wish to upload data from your spreadsheet to the CTP Platform for submission, please press the ‘Validate’ and then the ‘Upload’ buttons on the spreadsheet. Please allow plenty of time for the upload to work. We suggest uploading your data well in advance of the deadline as we will not be able to keep the Platform open passed the published cut-off date and time.
- Once you are happy with your data, you must click the ‘Submit’ button in the web table in order to successfully submit your return. Clicking ‘Upload’ in the spreadsheet will only pull through the data from the spreadsheet to the web table and does not submit your data. When you have successfully submitted, the page will refresh, a window will pop up acknowledging that you have successfully submitted, and you will no longer be able to edit the web table. You can confirm that you have successfully submitted by logging out of the system, logging back in again a few minutes later, and verifying that the RAG rating for the relevant quarter is a green circle and the status is showing as ‘Accepted’.
- Do feel free to contact the CTP team prior to the deadline at CTP@nihr.ac.uk if you would like us to verify that your returns have been successfully submitted.
If you click submit and the page refreshes but your return is not submitting and no rows are highlighted with validation issues, scroll down to the very bottom of the page and check for an error message about repeated REC numbers under the web table.
Video Instructions
IT Requirements
1. The CTP Submission Platform is only compatible with the following computer systems:
- Operating Systems – Microsoft Windows 7 and 8, Vista and XP.
Please note that the Platform is not compatible with Apple/Mackintosh operating systems. - Internet Browsers – Internet Explorer 7 and above, Google Chrome 7 and above, Mozilla Firefox and above, Opera 10 and above.
- Microsoft Office Applications – the CTP Submission Platform is only compatible with Microsoft Excel 2003, 2007 and 2010. The facility to enable macros is also an essential requirement.
Account creation and management
2. The web-site for the CTP Submission Platform can be found at: https://ccfctp.nihr.ac.uk
3. To participate in the CTP Submission Platform, we will create an account for you based on your name, e-mail, job title and the name of the organisation you represent. You will receive an automated e-mail asking you to validate your e-mail and provide you with a temporary password.
4. Only one account can be created per provider. If multiple people need to work on the submission, you can share your log in details or the spreadsheet can be downloaded and emailed to your colleagues.
5. If you do not receive an automatic email from noreply@ccfctp.nihr.ac.uk and the email is not in your spam/junk folder, please contact your local IT department to see if it has been blocked by the provider’s firewall. If the IT department cannot find it, please contact the CTP team as soon as possible.
6. Once the automated email is received, follow the Account Verification Link to validate the email address provided.

7. Once the email address is verified, login to your account using the temporary password provided in the automated verification email. You can copy and paste this from the e-mail.
8. Once you have successfully verified your email, the system will notify you that your password has expired and ask you to change the password to one of your own choosing.
9. Click ‘OK’ against the expiry message to bring up the Change Password function.
10. The password you choose must be between 8 and 16 characters in length. This needs to contain at least one number AND one upper case letter AND one lower case letter AND one of the following symbols (shown in blue): ! @ # $ % ^ & * ( ) _ + } { : ; ’. Type or copy and paste the password given to you on the registration e-mail into the Existing Password field and then provide your New Password and confirmation of password and press OK.
11. Once you login you will be required to agree to these terms and conditions in order to proceed.
12. When you click ‘OK’, the system will open the CTP Submission Platform Home for your organisation. This will show any historical submissions from previous quarters.
Managing your account
13. Under the ‘Your Account’ menu headings on the left hand side of the application, you will see a ‘Personal Details’ option and a ‘Change Email Address’ option. Please check your personal details when you first sign in to verify that they are correct.
14. To view or update your personal details, click the link under Your Account. Here you can update your title, name, job title and contact telephone number. Please note that you cannot update your organisation details; these are entered on your behalf by us. Also note that the organisation data on this system is provided by the Health and Social Care Information Centre, Organisation Data Service. If there is no value against the NHS Provider or it is incorrect, please contact CCF to get these details updated.
15. After you have amended your details, please press enter or ‘Update’ to update your details and then click ‘OK’ to the confirmation message. To cancel you need to select the cancel button on the screen.
16. To change your password at any time, please select the change password link. Please note that you need to choose a password which you haven’t used on the system before. The new password must also be between 8 and 16 characters in length and should contain at least one number, one upper case letter and one lower case letter, and one of the following symbols: ! @ # $ % ^ & * ( ) _ + } { : ; ’
17. If you need to change your email address, please contact the CTP team at CTP@nihr.ac.uk
Managing submissions
18. Once your account has been set up and you have accessed the system and changed your password, you are ready to start making submissions via the CTP Submission Platform.
19. Select the ‘Home Page’ link in the left hand menu under Your Account or Administration to return the submission home page at any time. This page will display the status of the submissions for the organisation you are representing. There are two submissions: one for Performance in Initiating and one for Performance in Delivering
The Submission Dashboard
20. For each organisation, the CTP Submission Platform home page provides a dashboard for the current submission window for Performance in Initiating and Performance in Delivering data returns, further referred to as the submission type. Under each submission type is a table providing status information about the submission.
- RAG: A red, amber, green traffic light system is in operation to provide a visual cue regarding the progress of the submission. A green light indicates that the submission is on track. An amber light indicates that the submission deadline date is approaching and a red light indicates that the submission deadline has passed and that the submission is overdue.
- Name: This field indicates the name of the submission period, comprised of the quarter and year.
- Status: This is the status of the submission. ‘Not Started’ means that the submission has not been opened for completion. ‘In progress’ means that it has been opened or that the user has started to enter data but has not yet submitted the return. ‘Accepted’ means that the submission has been validated and submitted to the system.
- Submission opens: This is the date that the submission window opens, when the return can be started.
- Submission deadline: Is the date by which the return must be submitted. NB: the data cut off is the last day of the quarter, not the submission deadline. Any changes affecting data that occur between the end of the quarter and the submission deadline should not be reflected on the return.
Data Completion Options
21. To complete a submission you have two options:
- Enter the information into the web table.
- Download a spreadsheet template, complete the details off-line, validate them, and then upload the data to the system via the spreadsheet.
22. When a return has been successfully submitted, the status changes to ‘Accepted’.
23. Both the web table and the spreadsheet validate the data entered to prevent errors and ensure high quality data. You cannot upload invalid data via the spreadsheet. There are two types of validation reports:
- Fields that are mandatory and have not been completed according to the data submission rules are flagged with a red warning to notify the user. You must correct these in order to upload the spreadsheet and/or submit your data; and,
- Fields that contain potential errors or are missing data are flagged with an amber recommended validation to notify the user (for example, when Date Site Selected, Date Site Confirmed and/or First Patient Recruitment dates are not in chronological order). Data can still be submitted at the user’s discretion; the system will not block submissions containing records with recommended validation.
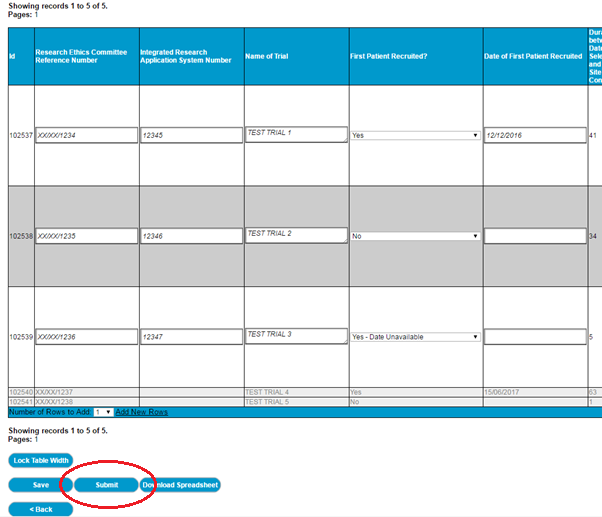
24. To start or open a submission click the ‘View Submission’ link against the relevant return – Performance in Initiating or Performance in Delivering. This will open the submission page. If you haven’t already started your submission, you’ll need to click ‘Start’ to create the first row in your submission. This will set your submission status to ‘In Progress’.
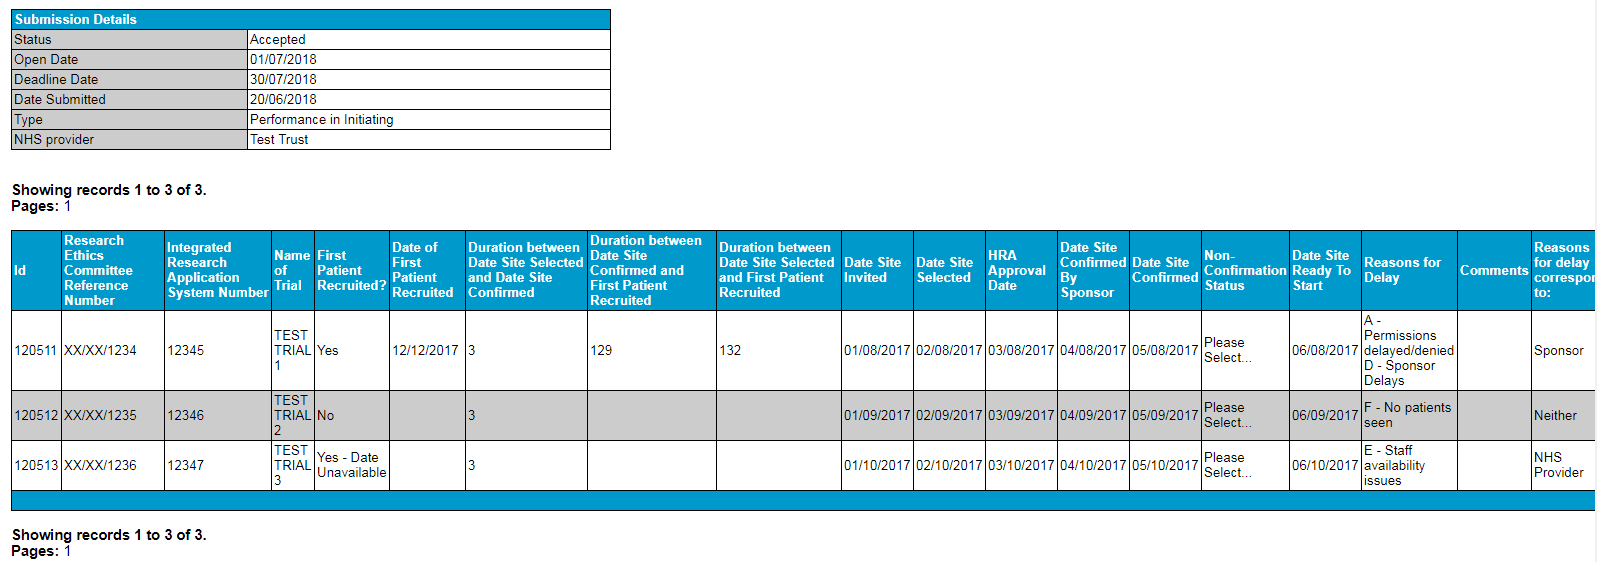
25. The Submission Details table provides information about the status of the submission, the date the submission window opened and the deadline for submission. It includes the submission type (i.e., Performance in Initiating or Performance in Delivering) and the name of the organisation making the submission. If this is wrong, please log out of the system and notify us immediately. The details table will also update to reflect the date that the submission is made.
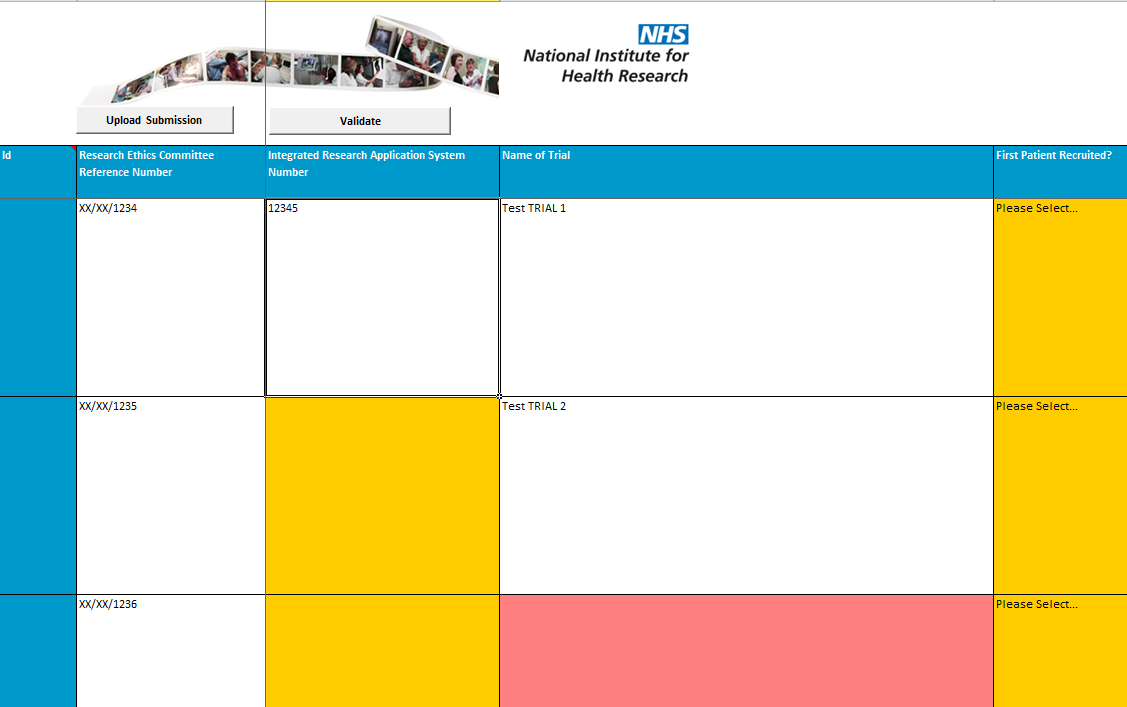
26. Click ‘Start’ to generate your submission as shown below. You can then choose to complete the web table by selecting ‘Add New Rows’ to the table, or you can click the button to ‘Download Spreadsheet’.
27. The system will automatically assign a line ID when a row is created and saved to the database – do not worry if the IDs appear out of sequence.
28. Please use the scroll bar at the bottom of the page to view the complete contents of the screen. The ‘< Back’ key will return you to the submission home page.
- NB: By ‘locking’ the web table with the ‘Lock Table Width’ button, the first (Title) row and the ID column won’t move whilst you scroll down and to the right to improve ease of data entry. This function will only work in Internet Explorer (IE) 9.
Using the Web Table
29. If you are using the web table to enter data, you will need to use the scroll bar at the bottom of the screen to navigate to the fields on the right. Alternatively, click in one of the cells of the row and use the tab key to navigate through the cells. Press SHIFT + TAB to move left (backwards) through a row.
30. Press ‘Save’ to store your data on the system; please save regularly to avoid the potential loss of data. The system is set to time-out after 30 minutes and will not give you a warning.
31. Keep all comments to 500 characters or fewer. Even if you are able to enter more than that, the system will cut the comment after 500 characters.
32. The ‘Name of Trial’ field currently only allows for 2000 characters. If the trial name is longer than that, please just enter the first 2000 characters and double check that the REC Number is correct.
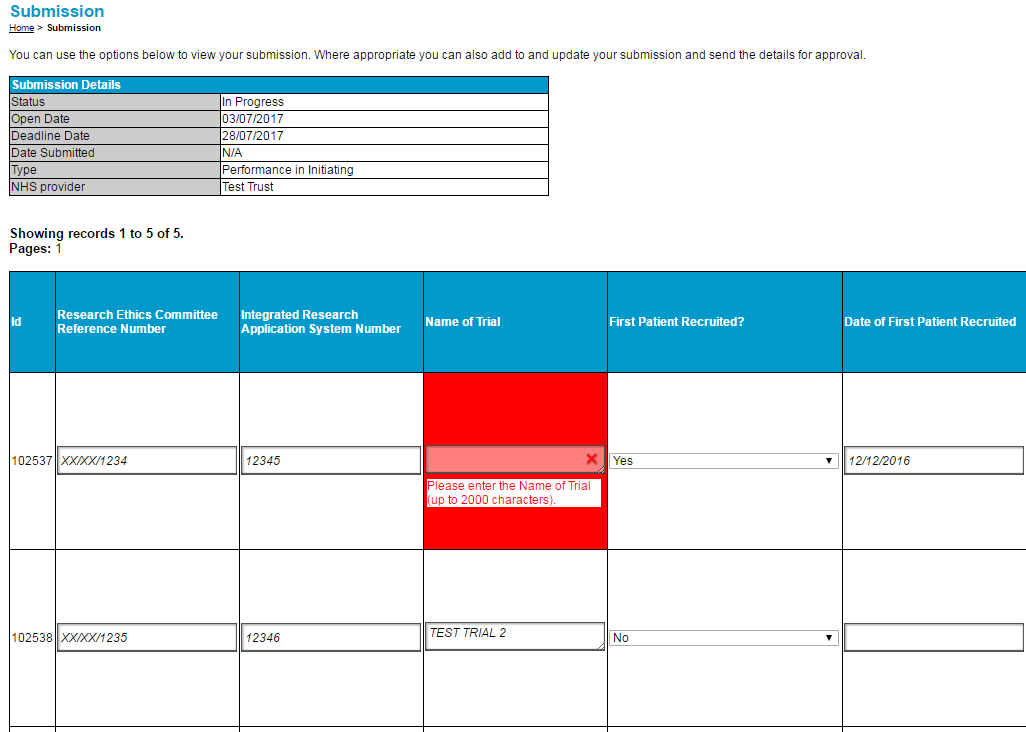
33. The system will highlight any fields containing data that appears to be incorrect. Red highlighting indicates that it is mandatory to fix the error before the system will let you submit, and amber highlighting indicates that it is recommended that the issue is reviewed but the system will still let you submit.
34. If fields have been highlighted in red or amber, please hover over them with your mouse to see the error or warning explained.
35. Users can refer to the Performance in Initiating and Delivering Clinical Research Submission Guidance for more information regarding how to complete the individual fields.
Using the Spreadsheet Download
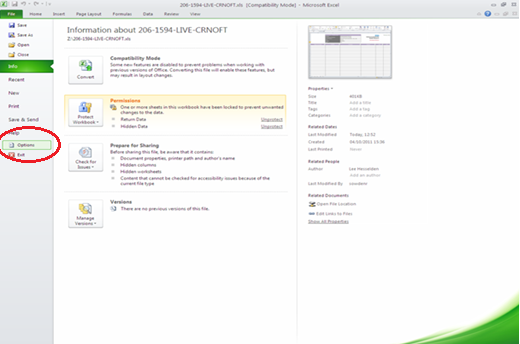
36. Prior to opening and downloading the CTP spreadsheet from the CTP Submission Platform, the following checks must be made externally, regarding local permission in Microsoft Windows Excel.
37. Open up your Excel application and under ‘File’ choose ‘Options’ and select ‘Trust Center’ (options may vary depending on your version of Excel).
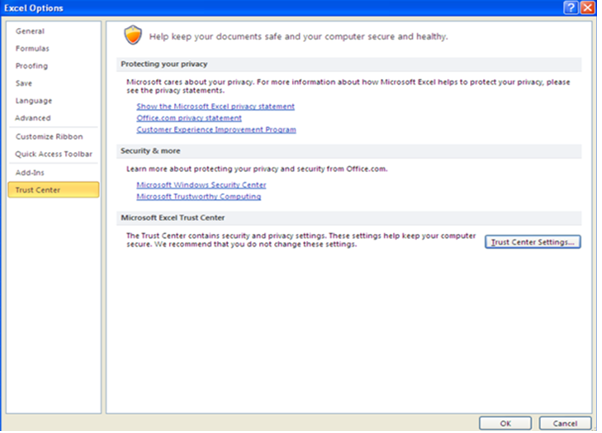
38. When the options window opens (shown below), go to the Trust Center menu on the left and then select the ‘Trust Center Settings’ button in the right window.
39. When the Trust Center Settings window opens, select ‘Macro Settings’ in the left hand menu and edit the macros settings as shown below.
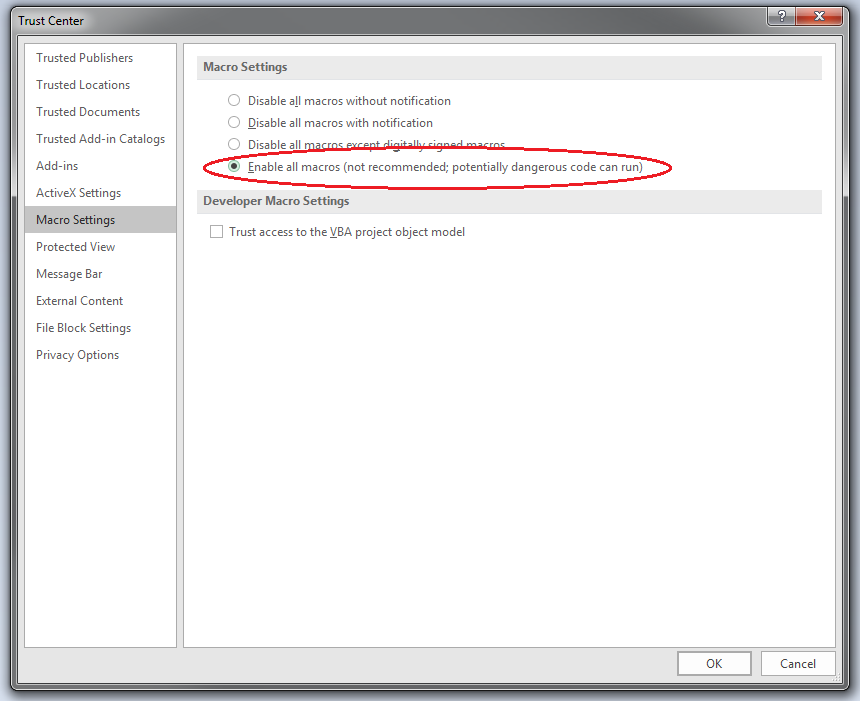
- NB: It is not necessary to disable all security settings in the Trust Centre, for example those regarding the opening of Outlook attachments, while using the CTP Submission Platform. Ensure that the settings are appropriate for use as disabling security measures may present a security risk from other applications.
38. You should reinstate all security settings after you’ve completed your submission, and you should never open an unknown file from the internet without the proper precautions in place.
39. Click the ‘Download Spreadsheet’ button beneath the web table to download a spreadsheet.
40. If you are using Internet Explorer, be careful to choose the ‘Open’ button to download the spreadsheet.
41. Do not press ‘Save’ or ‘Save As’ before opening the spreadsheet. Saving the downloaded spreadsheet locally will disable the uploading function of the downloaded spreadsheet.
42. Spreadsheets should be opened and not saved when first downloading from the website but after macros are enabled, a local copy can be saved and shared if desired. Just be sure NOT to have the spreadsheet and the web form open at the same time! This could cause duplications and errors in your submission.
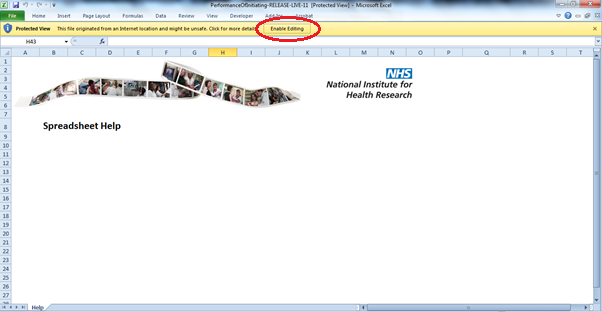
43. If you are working using Internet Explorer and have ‘protected view’ settings in place, you may need to press ‘Enable Editing’ and then ‘Enable Content’ in order to access the spreadsheet.
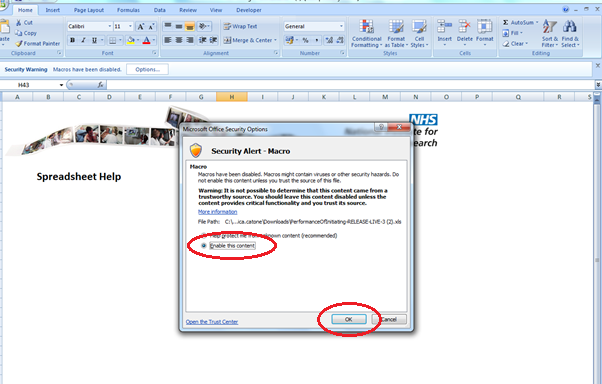
44. If you are using Google Chrome, you should receive a security warning that reads, ‘Macros have been disabled.’ Click the Options button.

45. This will bring up a Security Alert pop up. Click the ‘Enable this content’ radio button and click OK.
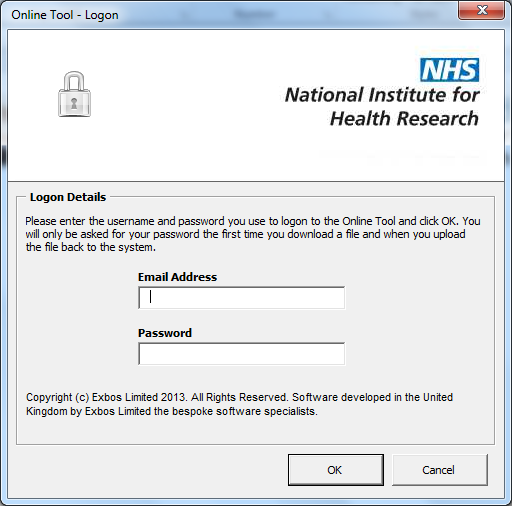
46. This will then display the authentication page. You will need to enter the e-mail address and password you normally use to access the CTP Submission Platform. If they do not match, you will receive an error message preventing you from accessing the form.
47. The system will then display a screen to say ‘Contacting Validation Platform’ before opening the spreadsheet.
48. Once the download is complete, you should save a local copy. The spreadsheet can be downloaded onto more than one machine and once downloaded according to these instructions, the spreadsheet will communicate with the submission platform, even when the internet browser is closed.
49. If you are copying and pasting into the spreadsheet, please use the command ‘Paste as’ and then choose values.
50. A ‘Data Mismatch Error’ may occur if you paste data from another source (e.g., EDGE) and inadvertently copy and paste spaces, hidden characters or metadata. This can be avoided by pasting the data as values from the original source into a blank Excel spreadsheet and running TRIM and CLEAN functions on the data before copying and pasting the clean data into the CTP spreadsheet.
51. Please note it is not possible to paste entire rows in to the spreadsheet download as the ‘Duration’ fields complete automatically from information in the date fields. These fields will only auto-complete after you have completed the entire record and have hit ‘Validate’.
52. The web table and the spreadsheet must not be open at the same time and the data must be validated by clicking the ‘Validate’ button at the top of the spreadsheet before the data can be uploaded to the platform.
53. The spreadsheet can otherwise be completed very much like the web table. Once you have validated the data and corrected any errors, upload the data from the spreadsheet into the web table by pressing the ‘Upload Submission’ button.
- NB: This only uploads your data onto the website; you still need to go into the website and press the ‘Submit’ button to successfully submit your return.
54. Please leave plenty of time to upload your submission from the spreadsheet; do not leave it until the deadline day.
55. The ID and three Duration columns are all automatically populated by the system using the data you provide, so please do not attempt to complete them. Most of these columns are read-only, but if you are able to enter any data into them, it will be deleted when you upload the spreadsheet.
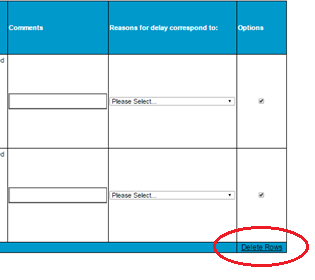
- NB: If you have selected one or more reason for delay (A-J drop downs) using the tick boxes in the Reasons for Delay field, you will have to also select a source of delay (i.e., NHS Provider/Sponsor/Neither/Both), and vice versa.
- Please see the PID feedback document for more details on how to explain delays to your trials.
56. The reasons for delay are selected using drop-down boxes. You may select multiple reasons for delay for each record.
57. If you wish to close a session but continue uploading at a later time, upload the data that is already entered and re-open later. The data uploaded and saved within the CTP Platform itself will be available in the spreadsheet when downloaded in a later session.
58. The system will take you through the authentication process again, but you will not receive a confirmation that your data has uploaded. However, you should now be able to see the data you have entered in the spreadsheet in the web table when you go back to the Submission home page. Again, be sure to save and close the spreadsheet before opening the web table to check if your data has uploaded successfully.
59. Errors in your submission will be highlighted in red or amber. Red errors must be cleared before submission can be successful. Amber errors are non-mandatory, and submission is possible without clearing them. Explanations of the errors can be seen by hovering over the field in the web table, or by checking the error column in the spreadsheet.
60. If you wish to delete records from your submission you can do so by using the tick boxes at the far right of the web table or the spreadsheet. If you are working in the spreadsheet, each selected trial will be deleted when uploading to the Platform. In the web table, once you have selected the records for deletion, press ‘Delete Rows’ and the records will grey out. Pressing ‘Save’ will permanently delete the record.
61. If you notice an error after you have clicked ‘Submit’, please contact the CTP team as soon as possible. We will be able to reopen your return for you to correct the error as long as you contact us prior to the deadline, but not after the deadline has passed. However, reopening returns will cause delays for you and for the CTP team, so please log out for a short while and log back in again before double checking your data is correct and all validation issues have been resolved before clicking the ‘Submit’ button.
62. If you would like to download a copy of your finalised spreadsheet to keep for your records or to use for publication on your provider’s website, you must do this before hitting ‘Submit’. If you have already clicked ‘Submit’ and the deadline has passed, you should still be able to highlight the data in your completed return and paste it into a blank Excel spreadsheet or Word document.
63. Once you are happy with your data, click the ‘Submit’ button.
64. If the following error is displayed; ‘Your submission contains the same Research Ethics Committee Reference Number for more than one record’, please ensure the duplicates are meant to be there, and then differentiate the duplicate REC numbers in some way (for example (a) (b) (c) etc). Accidental duplicates should be deleted.
65. The page should refresh and you should no longer be able to edit the web table.
66. If you are notified that the CTP Platform is being fixed, please make sure to shut down all current sessions, preferably by opening the Task Manager and ending any Excel applications and processes, since these can run in the background and through the browser cache and will interfere with fixes.
67. Once you have submitted, the RAG will turn to green and the status will become ‘Accepted.’ Please log out again and log back in to verify that this has occurred. If not, then your submission is not complete and you should contact the CTP team immediately.
Appendix 1 - Validation
1. In order to ensure high quality data, several validation measures have been put in place as briefly mentioned under ‘Submission Options’ above. Red alerts will prevent you from uploading your submission and amber alerts will flag questionable records but will still allow you to submit.
2. For all trials please enter information in to the following fields:
- Research Ethics Committee Reference Number
- Integrated Research Application System Number
- Name of Trial
- First Patient Recruited?
- Date of First Patient Recruited
- Date Site Selected
3. If the trial had a delay to recruitment, please include the reasons for delay, the source of the delay, and any relevant comments.
4. Enter information, if available, in to the following fields:
- Date Site Invited
- HRA Approval Date
- Date Site Confirmed By Sponsor
- Date Site Confirmed
- Non-Confirmation Status
- Date Site Ready To Start
If there are any delays to recruitment, please use the reasons for delay, source of delay and the comment box to explain them.
Error messages and validation for PI
|
Data Field |
Data Requirement |
Possible Error |
Error/Warning Message | |
|---|---|---|---|---|
|
Research Ethics Committee Reference Number |
Alpha-numeric characters, including symbols (“/”) |
2.If duplicate REC numbers are present |
1.Please enter a valid REC number 2.Your submission contains the same Research Ethics Committee Reference Number for more than one record |
|
|
Integrated Research Application System Number |
Alpha-numeric characters (100 characters) |
If field is blank |
If available, please enter a valid Integrated Research Application System Number |
|
|
Name of Trial |
Alpha-numeric characters (2000 characters) |
If field is blank |
Please enter the Name of Trial (up to 2000 characters) |
|
|
First Patient Recruited? |
Drop down; ‘Yes/Yes – Date Unavailable/No’ |
1.If no option is selected 2.If field is completed with other terminology |
1.Please indicate if the first patient was recruited
|
|
|
Date of First Patient Recruited |
In the format dd/mm/yyyy |
3.If date precedes Date Site Selected or Date Site Confirmed 4.If date is entered in other format |
3.Date of First Patient Recruited predates Date Site Selected or Date Site Confirmed 4.Please enter date in dd/mm/yyyy format |
|
|
Date Site Invited |
In the format dd/mm/yyyy |
1.If field is blank 2.If date is in other format
|
1.If available please indicate Date Site Invited 2.Please enter Date Site Invited in the format dd/mm/yyyy
|
|
|
Date Site Selected |
In the format dd/mm/yyyy |
1.If field is blank 2.If date is in other format
|
1.If available please indicate Date Site Selected 2.Please enter Date Site Selected in the format dd/mm/yyyy |
|
|
HRA Approval Date |
In the format dd/mm/yyyy |
1.If field is blank 2.If date is in other format
|
1.If available please indicate HRA Approval Date 2.Please enter HRA Approval Date in the format dd/mm/yyyy
|
|
|
Date Site Confirmed By Sponsor |
In the format dd/mm/yyyy |
1.If field is blank 2.If date is in other format
|
1.If available please indicate Date Site Confirmed By Sponsor 2.Please enter Date Site Confirmed By Sponsor in the format dd/mm/yyyy
|
|
|
Date Site Confirmed |
In the format dd/mm/yyyy |
1.If field is blank 2.If date is in other format
|
1.If available please indicate Date Site Confirmed 2.Please enter Date Site Confirmed in the format dd/mm/yyyy
|
|
|
Non-Confirmation Status |
Drop Down; ‘Sponsor declined site confirmation/Site declined to participate’ |
1.If field is blank 2.If date is in other format
|
1.Non-Confirmation Status : If data available please ensure you select from drop-down menu 2.The value you entered is not valid. A user has restricted values that can be entered into this cell.
|
|
|
Date Site Ready To Start |
In the format dd/mm/yyyy |
1.If field is blank 2.If date is in other format
|
1.If available please indicate Date Site Ready To Start 2.Please Date Site Ready To Start in the format dd/mm/yyyy
|
|
|
Reasons for Delay |
Platform Webtable: Tick box; A-Permissions Delayed/Denied B – Suspended by sponsor C – Closed by sponsor D – Sponsor delays E – Staff availability issues F – No patients seen G – No patients consented H – Contracting delays I – Rare diseases J – Other; 'Tick/Blank’
Spreadsheet download: Drop down; A-Permissions Delayed/Denied B – Suspended by sponsor C – Closed by sponsor D – Sponsor delays E – Staff availability issues F – No patients seen G – No patients consented H – Contracting delays I – Rare diseases J – Other; ‘Y/Blank’ |
If field is not completed when ‘Reasons for delay correspond to:’ is populated. |
If ‘Reasons for delay correspond to:’ has been filled, please select at least one reason. |
|
|
Comments |
Free-text 500 character limit |
If field is completed with other terminology |
Word limit exceeded |
|
|
Reasons for delay correspond to: |
Drop Down; ‘NHS provider/Sponsor/Both/Neither’ |
If field is completed with other terminology |
Reasons for delay correspond to: please select from the drop down options
|
|
Error messages and validation for PD
|
Data Field |
Data Requirement |
Possible Error |
Error/Warning Message |
|---|---|---|---|
|
Research Ethics Committee Reference Number |
Alpha-numeric characters, including symbols (“/”) |
If field is blank |
Please enter a valid REC number |
|
Integrated Research Application System Number |
Alpha-numeric characters |
If field is blank |
Please enter a valid IRAS number |
|
Name of Trial |
Alpha-numeric characters (2000 characters) |
If field is blank |
Please enter the Name of Trial (up to 2000 characters) |
|
Target number of patients agreed? |
Drop Down; ’Not available/Not agreed / Number Agreed / Range Agreed’ |
1.If field is blank 2.If field is completed with other terminology |
1.Please indicate if Target number of patients is agreed 2.The value you entered is not valid. A user has restricted values that can be entered into this cell. |
|
Minimum Number of Patients agreed (Enter same in both if only one number) |
Numeric up to 5 digits |
1.If field is left blank when ‘target number of patients agreed?’ is ‘Number Agreed’ or ‘Range Agreed’ 2.If field is completed when ‘target number of patients agreed says ‘not available/ not agreed’. 3.If range entered or other format |
1.Please indicate the minimum number of patients agreed 2.Please remove minimum number of patients or review the ‘Target number of patients agreed’ field 3.Minimum number of patients should be entered as a number |
|
Maximum Number of Patients agreed (Enter same in both if only one number) |
Numeric up to 5 digits |
1.If field is left blank when ‘target number of patients agreed?’ is ‘Number Agreed’ or ‘Range Agreed’ 2.If field is completed when ‘target number of patients agreed says ‘not available/ not agreed’. 3.If range is entered or other format |
1.Please indicate the maximum number of patients 2.Please remove maximum number of patients or review the ‘Target number of patients agreed’ field 3.Maximum number of patients should be entered as a number |
|
Target date to recruit patients agreed? |
Drop Down; ‘Not available/Not agreed’, ‘Date agreed’ |
1.If field is left blank 2.If field is completed with other terminology 3.Please indicate if Target Date Agreed to recruit patients is available 4.The value you entered is not valid. A user has restricted values that can be entered into this cell. |
|
|
Date Agreed to recruit target number of patients |
In the format dd/mm/yyyy |
1.If field is left blank when Target Date Agreed to recruit patients is ‘Date agreed’ 2.If field is completed when ‘Target Date Agreed to recruit patients is ‘Not available/ Not agreed’. 3.If range or other format is entered |
1.Please indicate the date agreed to recruit target number of patients 2.Please remove date agreed to recruit target number of patients or review the ‘Target Date Agreed to recruit patients agreed?’ field 3.Date agreed to recruit target number of patients should have the format dd/mm/yyyy |
|
Total number of patients recruited at the agreed target date |
Numeric up to 5 digits |
If range is entered or field is completed when ‘Target number of patients agreed?’ is Not available/ not agreed, and if ‘Target Date To Recruit Patients Agreed?’ is ‘Not available/ not agreed’ |
Please remove Total number of patients agreed at target date or review the 'Target number of patients agreed' field |
|
Date That The Trial Closed To Recruitment |
In the format dd/mm/yyyy |
If range or other format is entered |
Date the trial closed should have the format dd/mm/yyyy |
|
Total Number Of Study Participants Recruited |
Numeric up to 5 digits |
If field is blank |
Please indicate the total number of study participants recruited. |
|
Reason For Closure Of Trial |
Drop Down; ‘Recruitment finished / Withdrawn by Sponsor / Withdrawn by Host’ |
If field is completed with other terminology |
The value you entered is not valid. A user has restricted values that can be entered into this cell. |
Version control
|
Date |
Section updated | Nature of update |
|---|---|---|
|
June 2019 |
Using the spreadsheet download |
Updated |
|
June 2019 |
Whole document |
Links updated for the new NIHR website |